First steps in Stavario
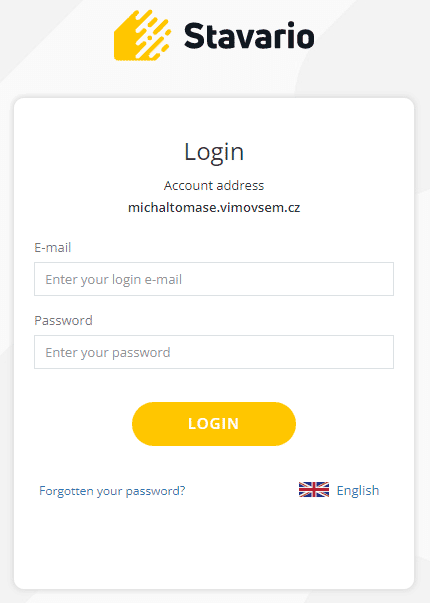
1. Log in
Log in to the Stavario web interface using the credentials sent to your email after registering for the demo.
Also read:
Quick contact for support:
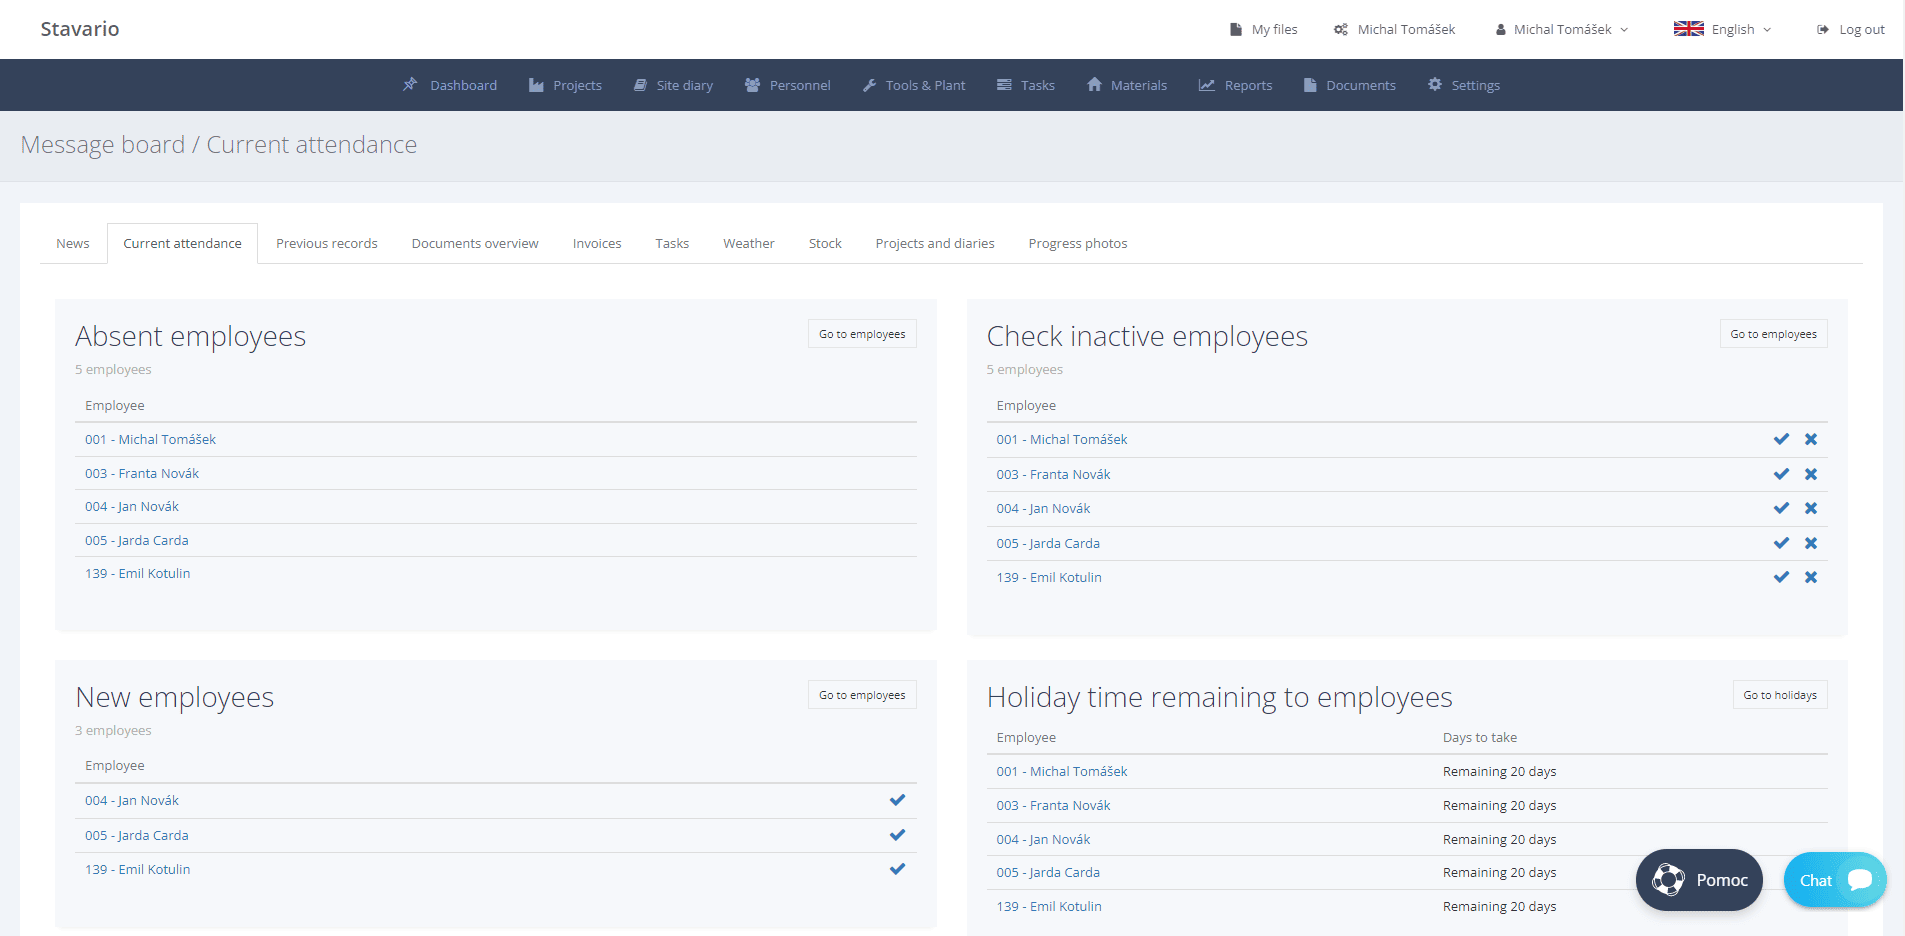
2. View the Notice Board
After logging in, the Notice Board will open. You will find a basic overview of your employees and you can easily click through to the other tabs as well.
Also read:
Quick contact for support:
3. Create a project (building)
In the demo, you already have one test building ready. By following the steps below, you can create your own new building in just a minute.
TIP: To get started, you only need to fill in a few basic details. You will add everything else later as needed.
1. In the web interface, hover over Projects in the main menu and click Project Overview in the submenu.
2. Click the green Add Record button on the page.
3. In the Basic Information tab, fill in the Name column on the left, and next to the map, Enter the location, where the project or building is located. You can enter a specific address or GPS coordinates.
4. Under the position indication there are two boxes for GPS: Allowed Deviation. We recommend keeping the default value, but you can adjust it as needed. It is the area around the building that you will allow employees to enter when entering and leaving work (when entering attendance, the location of the device from which the employee logs in is automatically loaded).
5. IMPORTANT: Switch to the Accountable Users tab. Here you will later mark the employees whom you want to unlock the entire project for. Check the Admin option for now. If you do not designate yourself as a responsible person, you cannot create a Daily Construction Log for the project.
6. At the very bottom, click the Save and Close button.
And that's it, the project is established. Now create a new electronic construction journal for it.
Also read:
Quick contact for support:
4. Create a new construction journal
In practice, an electronic daily construction log will save you dozens of hours of work and a sea of worries every month. The automatic functions create daily records, keep track of attendance , and you can easily insert weather and other data into it. The records are simple, transparent, and indisputable. You can set it up in a matter of seconds.
How do you start a new journal?
1. After logging in to the web interface, move the mouse over Construction log in the main menu and click Create New Log in the submenu.
2. For the exam, just fill in:
- the first column Name of the new journal
- and two lines below Assign a new journal to the created project
3. At the very bottom, click the Save and Close button.
You have created a new construction journal. Now add the first daily entry to it.
How to add a new daily entry to your journal
TIP: If you use the mobile application for employee attendance, the daily record will be created automatically when the first worker on the construction site reports arrival to work via the application.
1. In the main menu, move the mouse over the Daily construction log and click on Daily Recordsin the submenu.
2. Click the green Add Record button on the page.
3. Select the Date, for which you are creating a daily record.
4. From the menu, select the Daily construction log,that the daily record will belong to.
Note: You created the project in the 3rd section of this manual and it usually contains only one construction log. If for any reason you have created multiple construction logs for one project, select the specific construction log.
3. At the very bottom, click the Save and Close button.
Now you have the Daily construction log ready, including the first daily entry. All that's left to do is fill in everything necessary.
How to add data to the daily record:
1. In the main menu, move the mouse over Daily construction log and click on Daily Records in the submenu.
2. In the overview, click on any line of the daily record. (If you just started the demo, you only have one line.)
3. Fill in the selected items, Weather, People on-site, and Work performed are mandatory, and then click Save and Close.
TIP:In the items Weather and Persons on the construction site, data can be entered automatically. Click on a selected item, such as Weather, and click the white Get Data button above the text field. From the table, then select from which times of the day the data should be loaded. The information comes from the Czech Hydrometeorological Institute station that is closest to your building. In the People on construction site item, click on the people who worked on the construction site that day. The times of arrival and departure from the construction site are filled in automatically. This feature means that you do not have to enter the data manually.
The construction log is created, the daily record is filled. Now it's time to add the first employee.
Also read:
Quick contact for support:
5. Add employees
You can insert employees into Stavario in a few seconds. However, to begin with, we recommend proceeding slowly, step by step.
1. Move the mouse over Employees in the main menu and click on Employeesin the submenu.
2. On the employee listing page, click the green Add Record button.
3. Fill in the Visible to User tab
Here, indicate the persons who have the right to see the given employee in the system. For now, check only yourself (the Admin option).
4. Fill in the Basic Information tab
Fill in the First Name, Last Name , and Hourly Wage. In order for attendance to work correctly, these three fields are enough. You can easily set everything else later.
There is a preset number in the Employee Code field. It serves as an employee designation and at the same time as one of the two login data necessary for the mobile application.
5. Fill in the Personal data tab
Here, it is important to fill in the worker's phone number so they can receive their Employee Code (see previous) and PIN. The worker will need this information to log into the mobile application.
5. At the very bottom, click the green Save and Close button.
TIP: If you entered your own phone number in the Personal data tab, you received an SMS with new data for logging into the mobile application. If you did not enter your number, use the Employee Code and PIN, which came by email after demo registration.
Also read:
Video:
Quick contact for support:
6. Try attendance (in the role of a worker)
In order for attendance records to work, it is ideal if every worker on the construction site has our mobile application installed on their phone that they can use to log in. However, not everyone owns a smartphone with a data plan. On the construction site, it's only necessary for the foreman to have a tablet or smartphone. Each worker logs in separately via his device and it literally only takes a few seconds for everyone to announce their arrival at work.
What does entering work arrival look like in practice
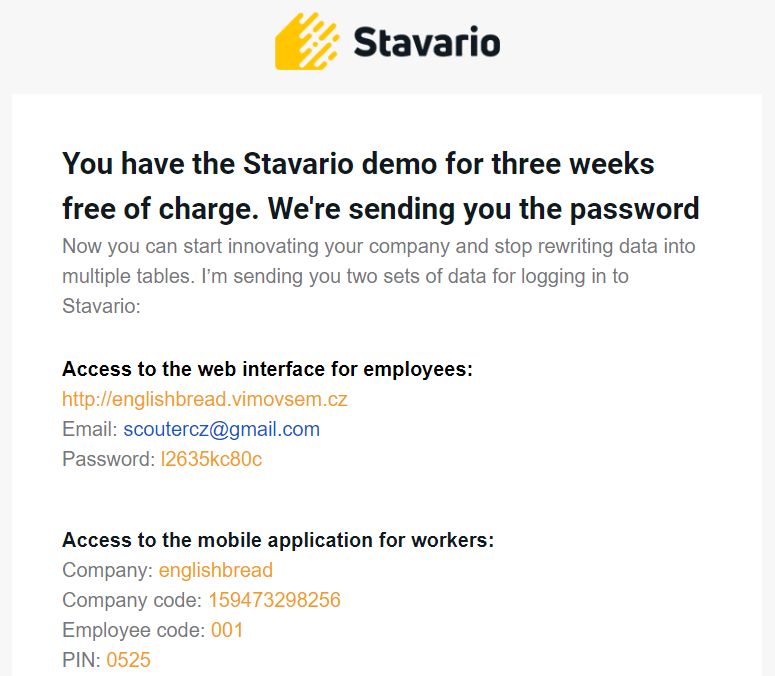
After registering for the Stavario application, you will receive an e-mail with your credentials. The same e-mail or SMS will be delivered to every employee you add to the system.
Step 1 - Download the app
If you have entered the worker's phone number or e-mail address in the Personal data tab, they will automatically receive an introductory SMS or e-mail with a link to download the mobile application to his phone. If the employee accidentally deletes the message with the link, the application can be found in the AppStore (iOS) or Google Play (Android) under the name "Stavario".
You can download the application here:


Step 2 - Join your company
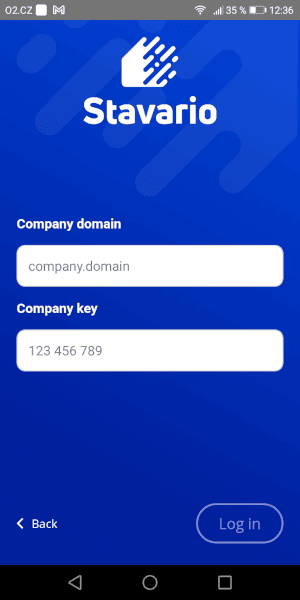
The worker fills in the Company and Company Code and confirms by tapping OK. This step is only necessary once when the application is first launched.
The Company and Company Code data will be sent to the worker by SMS or e-mail when you create their card, the same way you received it when you created the Stavaria demo.
Step 3 - Login
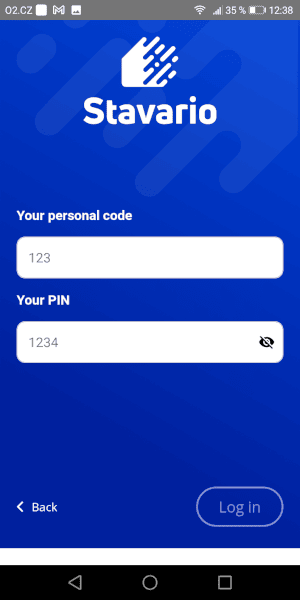
From the previous screen, the worker can get to the login page. It appears every time the application is launched. Here they fill in their Employee code (three digits from thePersonal Data card) and personal PIN. You will find this data in the information SMS/email. Then just confirm by tapping on OK.
TIP: Inform employees to write down and remember their Employee Code and PIN.
Step 4 - Confirm that you have read the documents
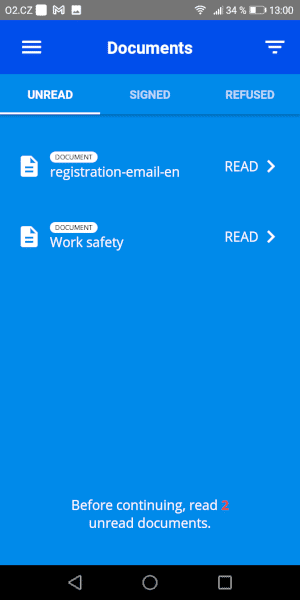
After logging in for the first time, the worker can see a menu of several documents to read (e.g. news from the company, health, safety, etc. - it depends on your settings). They must confirm reading each of them with their signature, otherwise, the application will not be unlocked and the worker will not be able to announce his arrival at work.
Step 5 - Coming to work
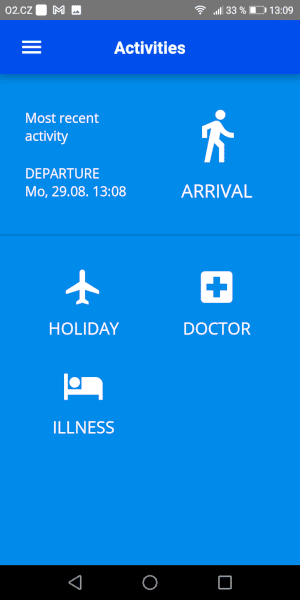
As soon as the worker logs in and confirms that they have read all the documents, they can announce their arrival at work:
1. Tap Arrival
2. Select the Project / Construction you will work on
3. Confirm your identity by taking a photo of yourself *
4. Confirm the photo by tapping OK
* Note: In order for the application to allow the worker to take a photo and announce his arrival at work, the device must have the Positioning feature turned on. The reason is to check the actual presence of the worker on the construction site, see chapter 3, point 4.
It's done, and by using the application, the worker sends all of this information to Stavario:
- who started working, when and where
- at which construction site they are currently located,
- about how many hours they have worked,
- which tools they are working with
- about requests for leave or a doctor's pass
- or requests for materials, services, and more.
Also read:
Video:
Quick contact for support:
7. Add the first item to the property
Where exactly are the drills, jackhammers, stepladders, extension cords, scaffolding, and other equipment? Who is responsible for it right now? Who handed over a particular piece of equipment to whom, when, and in what condition? You will have an overview of this from the moment you register your equipment in the property database.
1. After logging in to the web interface, move the mouse to Assets, in the main menu, and click Asset recordsin the submenu.
2. On the property listing page, click the green Add Record/Folder button.
3. In the Basic Information tab, enter e.g. Drill in the Name. column. This is the only required item, you can add everything else later. The Code is also important. Based on this, the mobile application recognizes that the worker is taking this exact drill from the warehouse.
4. At the very bottom, click the green Save and Close button.
Done. From now on, your property is in the database, and workers can borrow or return it from the warehouse via the phone application. Just scan with your phone or type in the equipment code manually. The company then knows exactly where and with whom the property is located, and if necessary, calls the person who is responsible for it at that moment. Employees can also send requests for service, for example, to the property.
What it looks like to receive tools from the warehouse:
Also read:
Video:
Quick contact for support:
FAQs
Just open our registration form , fill in your company information and press the "Send" button.
To log in, you must open the specific URL address of your company, which was assigned to you during registration and sent to your e-mail (yourcompany.vimovsem.cz). Here you enter the login information found in the same email.
The user logs in using an e-mail and a password to the administration on the website (yourcompany.vimovsem.cz).
The employee logs into the mobile application using the ID and PIN generated by the user.
Attention!
- If a user wants to log in to the daily construction log via the mobile application, he must also be created as an employee.
- If an employee wants to log in to the construction journal via the mobile application, he must also be created as a user.
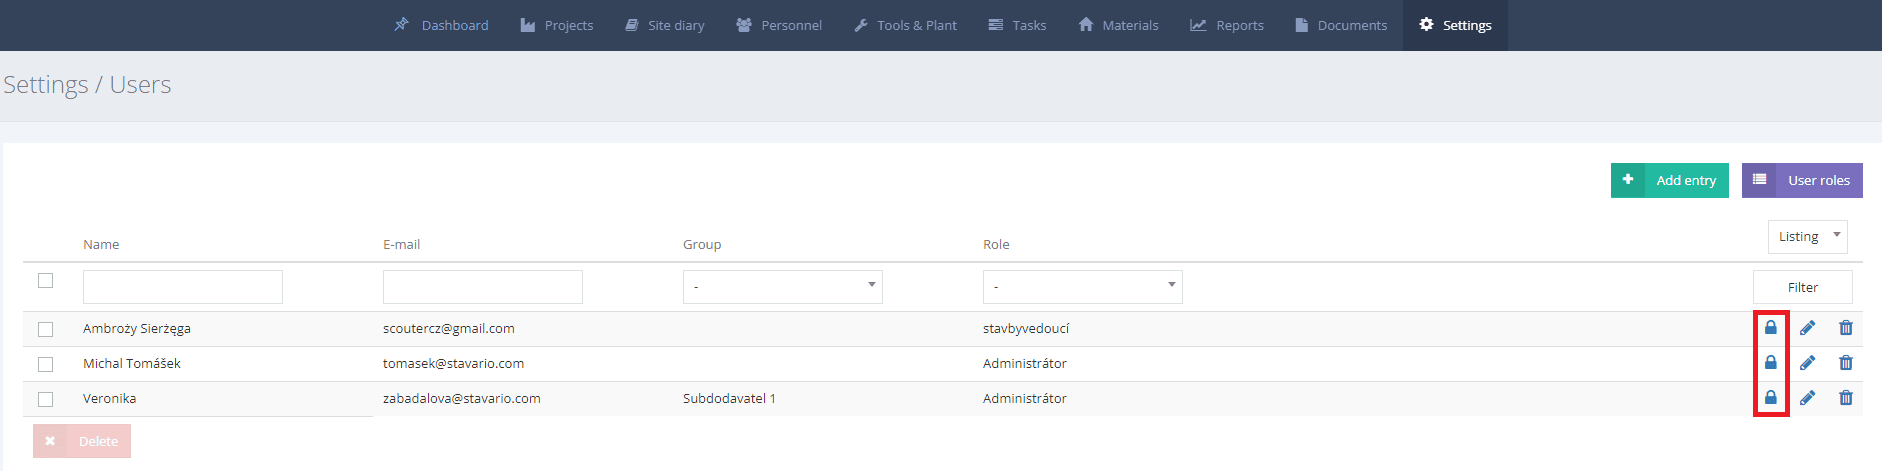
Send the new PIN via the lock icon in the "Employees / Employees" section of the selected employee.
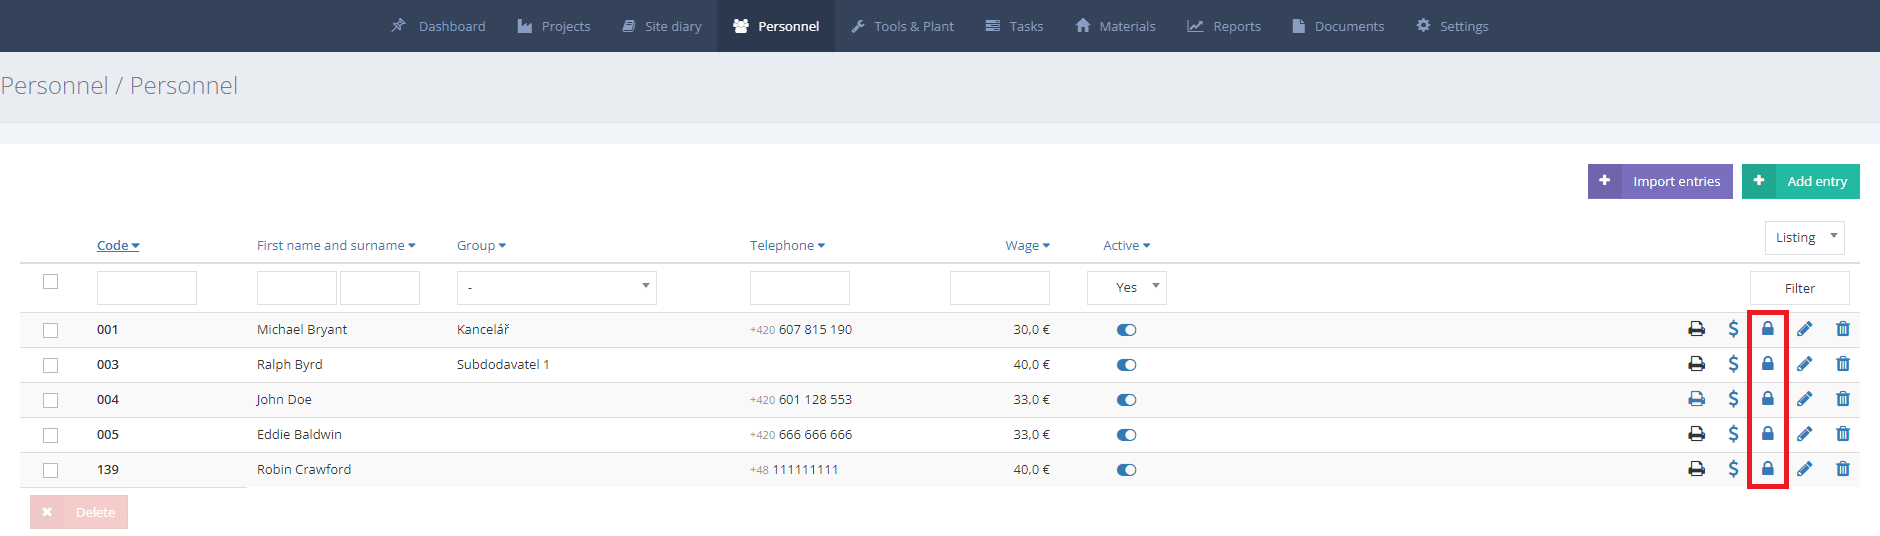
Send the new PIN via the lock icon in the "Settings / Users" section of the selected user.
Please check your internet connection. Is your wifi router blocking your connection? Do you have data on your phone?
If this happens, check your phone's app settings to see if the Stavario app has location sharing enabled. If so, try turning on, for example, the map application to check if the phone can detect the user's location.
For an employee to access assets in the mobile application, you must assign them to a group in the "Employees / Employees" section, where you select the relevant employee and assign the group to them.
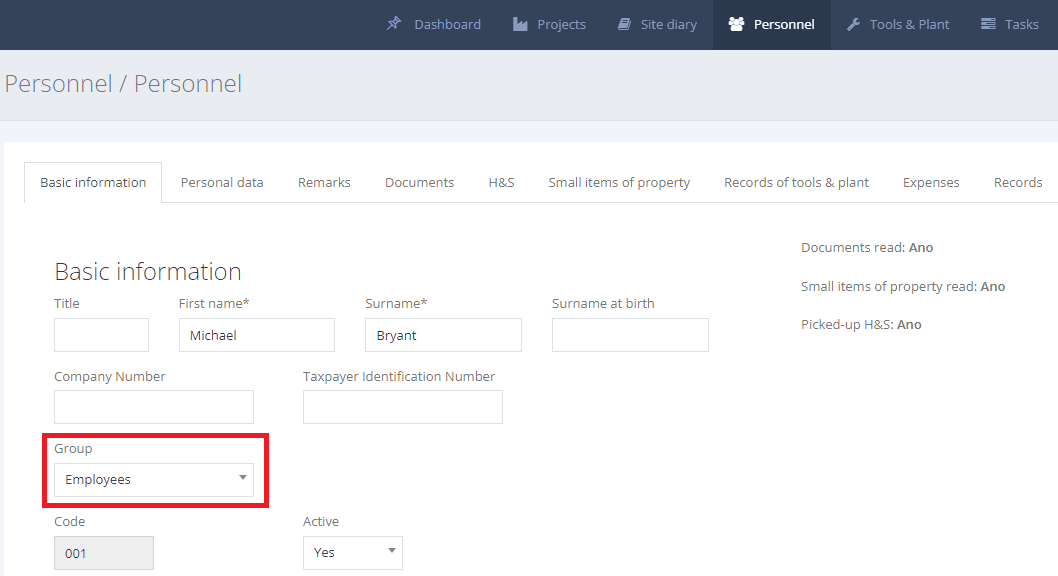
If you do not have groups created, you can do so in the "Employees / Groups" section.
If the employee sees a GPS deviation in the records, it is necessary to verify the GPS position in the mobile device:
- Turn on the Maps application - you will verify and update the GPS location with which the mobile device works. (If the dot is gray, the position is not current, but when it is blue, the mobile device is working with the current GPS position.)
- Clear the application cache in "Settings / Applications and notifications - Stavario / Storage and cache / Clear cache"
- Check your location usage access settings
- General location access is required (Stavario app checks at startup)
- The detailed location setting is "Google positioning accuracy" - we recommend that you turn it on
The Stavario application works with GPS data obtained by the mobile device system. If the deviation in the application is significantly different from reality, it is necessary to verify the functionality of the GPS chip in the mobile device (according to point 1, or through deeper diagnostics).
All records seen and printed by the client/investor must be in the Common Record. Company records are bookmarks for subcontractors and technical supervision of the investor. If you have subcontractors, everyone writes in the tab under their company and their name. The main administrator then converts their records into a joint record.
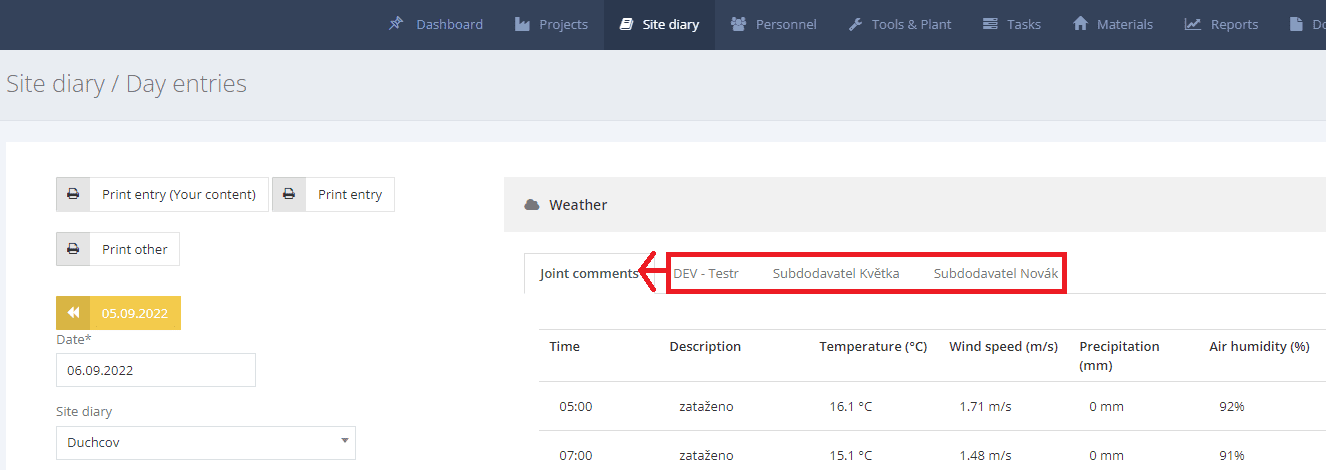
Tip: If you want to write directly to the joint record and not convert from the corporate record, go to "Settings / Users / User roles" and in the section "Build log / Daily records" > check "Write joint record".

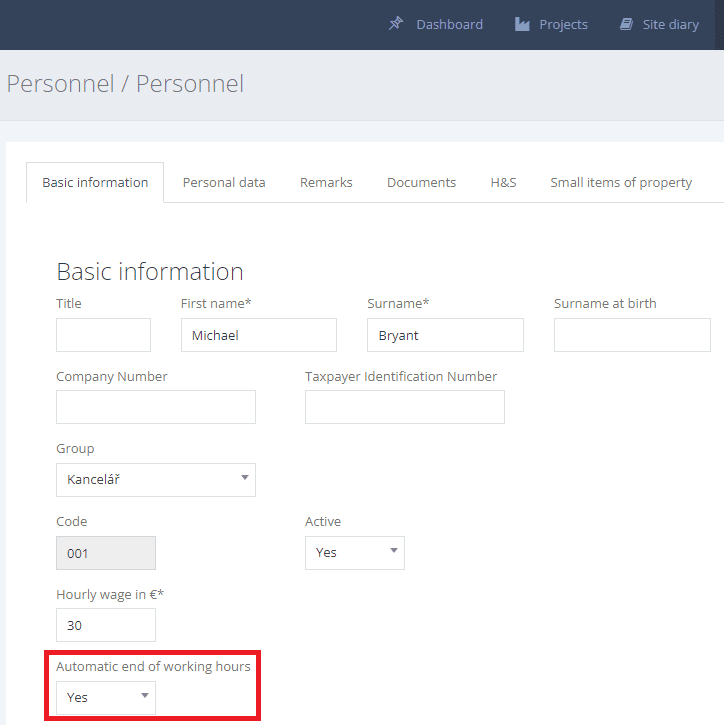
If the employee did not enter "Leave" and the employee has "Automatic end of working hours - No" set in the administration, the system did not end the day automatically. You can add a departure manually:
- In the "Employees / Records" section, delete the arrival record on the given unfinished day using the trash icon
- At the top right of the screen, select "Add workday"
- Select the employee, the project, select the record type "Arrival + Departure" and set the date and time of arrival and departure. It is also necessary to turn off the note, e.g. "Hand edited."
- Click the "Submit" button
If you want to end working hours after a specified number of hours automatically, go to the "Settings/Basic settings" section and in the "Basic settings" submenu you can adjust "Automatic ending of working hours"..
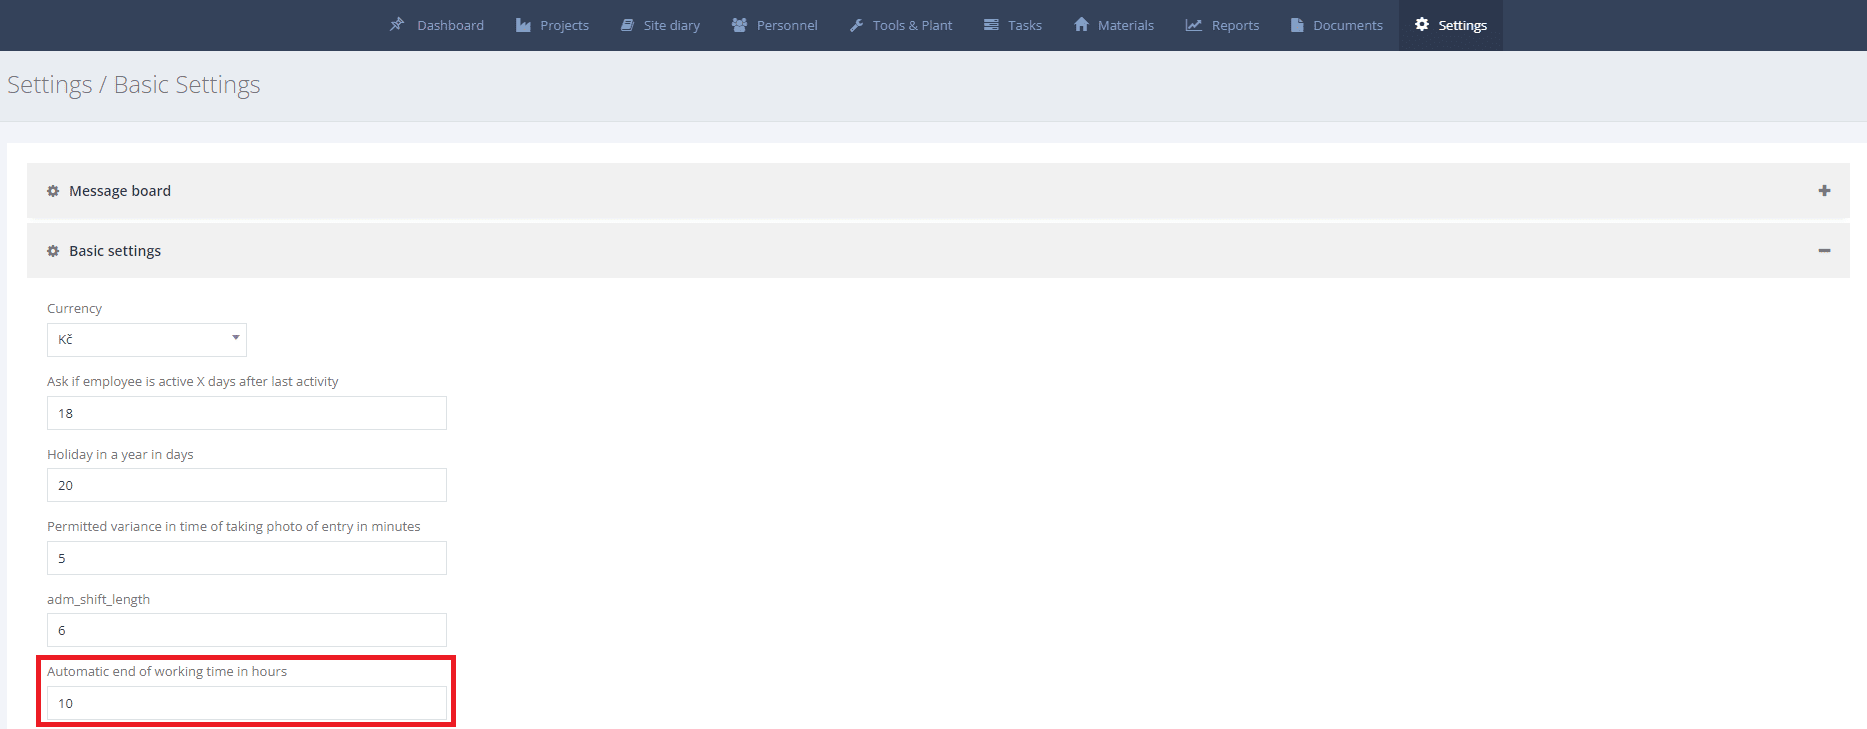
Attention! In order for this setting to be valid, it is necessary to have "Automatic termination of working hours - Yes" selected for the employee in the "Employees / Employeessection.
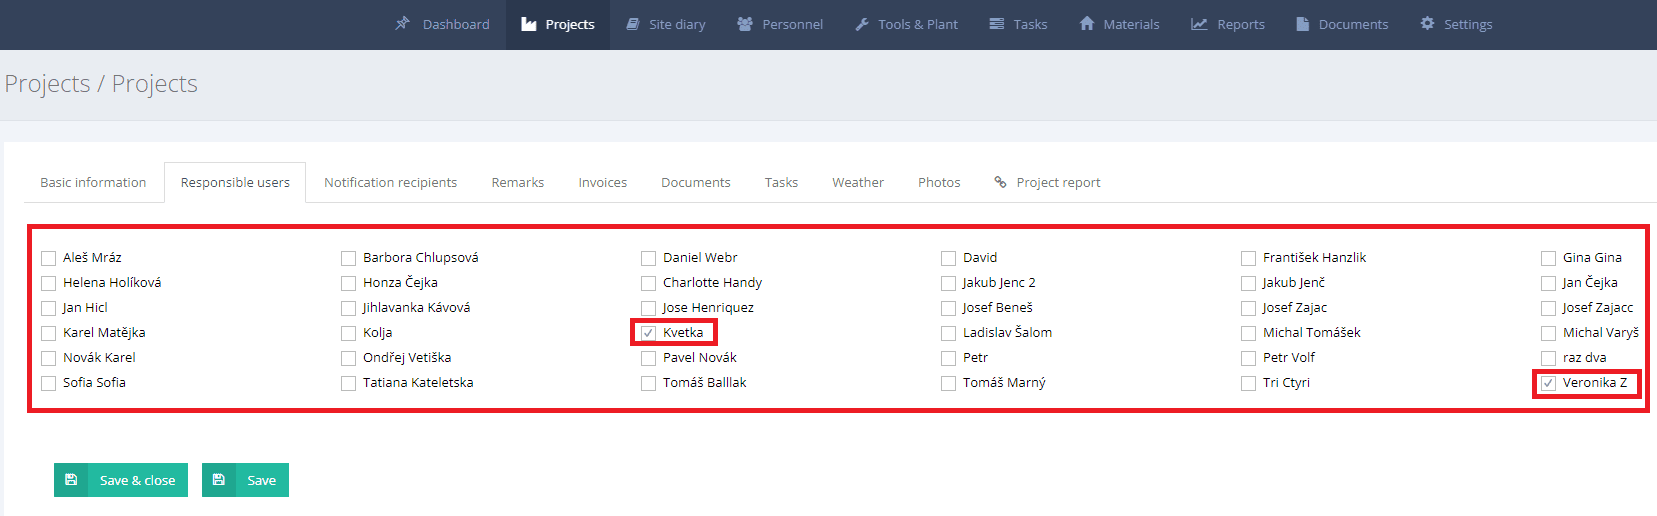
In this case, the user is not assigned to the project. You set the assignment to the project in the "Projects / Projects" section in the "Responsible users" tab.
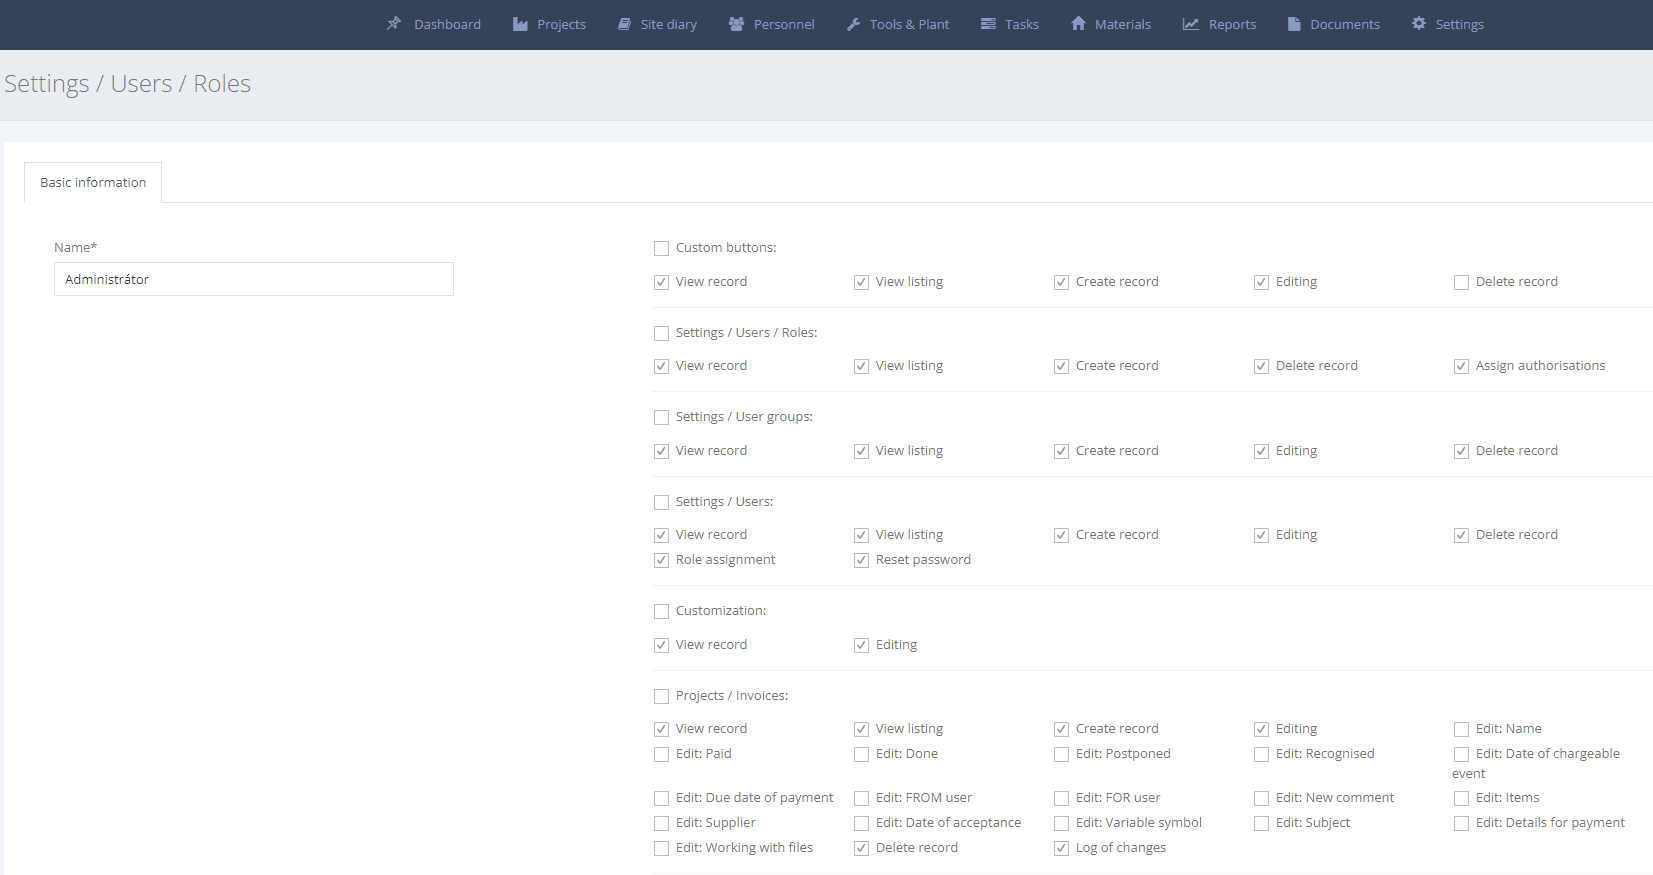
The user does not have user roles set. You set roles in the "Settings / Users" section, where you click on the "User roles" button and select the role in which the given user is a member. Here you set which modules and functions the user role has access to.
Didn't find what you were looking for?
Book your training
Have you tried the free demo, read the help, watched Pep's webinar and still don't know how to get started or want to demonstrate the main benefits of the tool live? We would love to see you!