Employees
This module contains records of employees, records of attendance, assets taken over and other information.
Tip: The "Bulletin / Attendance" agenda in the Stavario application provides a quick overview of the status and activity of employees immediately after starting the application. You thus have an immediate overview of employees on construction sites or employees at the doctor's office.
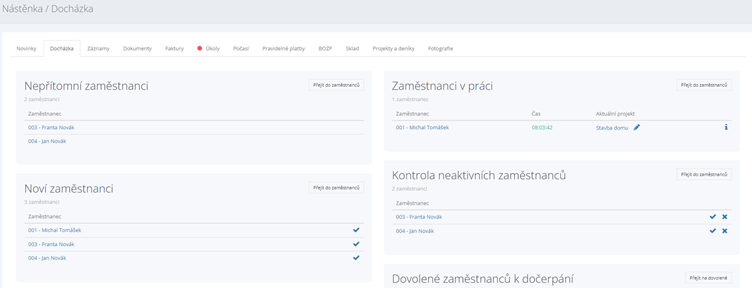
Agenda Employees
The employee record is the de facto personal card of the employee. Contains an overview of information associated with a specific employee. You will quickly get an overview of the loaned property, health and safety or the remaining holiday entitlement.
Records can be taken gradually, manually, or a template can be used for mass import.
Creating a new record
- In the open "Employees / Employees" agenda, press the button
 .
. - In the "Visible for users" tab, mark the users to whom employees and information about them should be displayed during further processing. At least one entry must be filled.
- Complete the information and records in the individual record cards. You can continuously save the records in progress using the button .
 .
. .
.The system allows you to process data in parts, e.g. by creating an employee record, entering basic mandatory values. You can fill in the other information later. However, pay attention to the mandatory data.

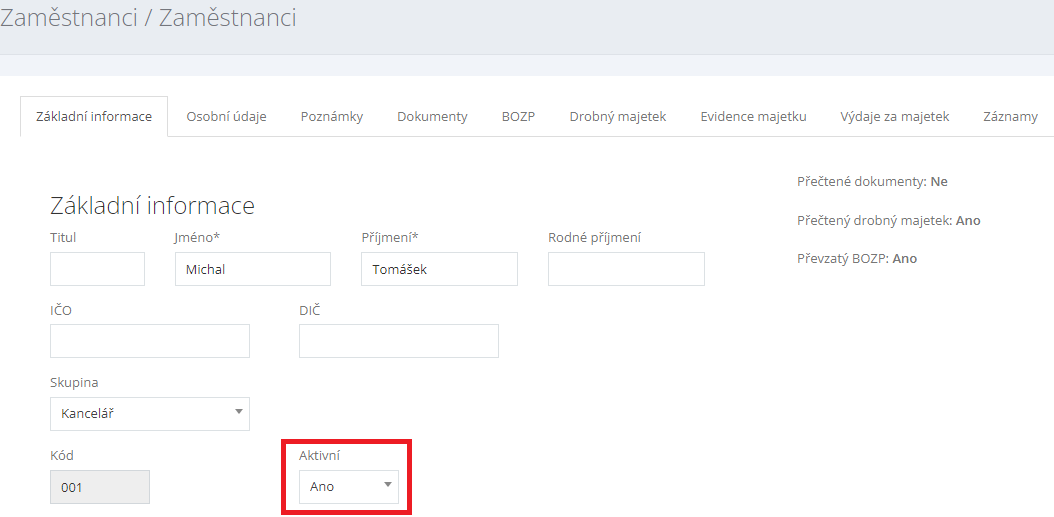
Basic information tab
The card combines basic information about the employee.
Mandatory data
- Name and surname
- Code - employee code (filled in automatically, but you can change it)
- Hourly rate – used to calculate project costs in the Reports module
If the fields are left blank, the system will mark them in red when saving and you will be prompted to complete them.
Additional information in the "Basic information" tab
- Title
- Birth surname
- ID number
- TIN – TIN in the form CZ123456789
- Group – the group to which the employee is assigned. The group is used for mass communication.
- Active - information on whether the employee is employed (Yes / No)
- Automatic termination of working hours - automatically terminates the attendance record
Time setting
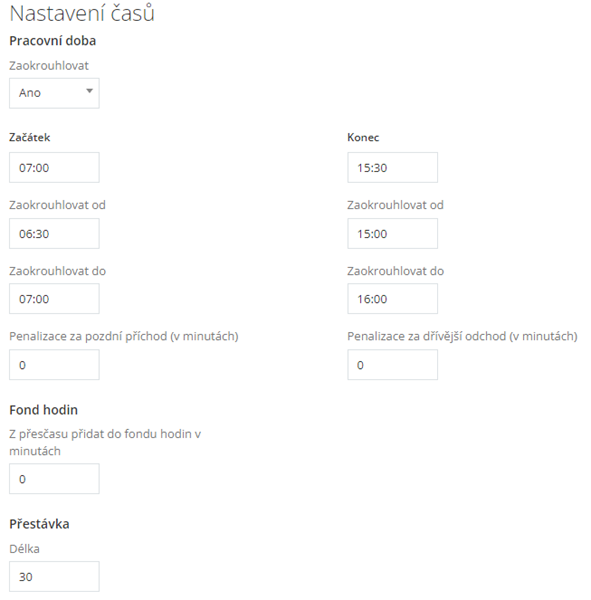
Basic working hours, employee breaks and rounding of working hours are set here.
- Round - Yes/No
- Beginning
- End
- Fund of hours
- Break
Personal data tab
Summary of information for communication (telephone connection, email address), bank connection, basic information about the employment relationship and also the size of work clothes.
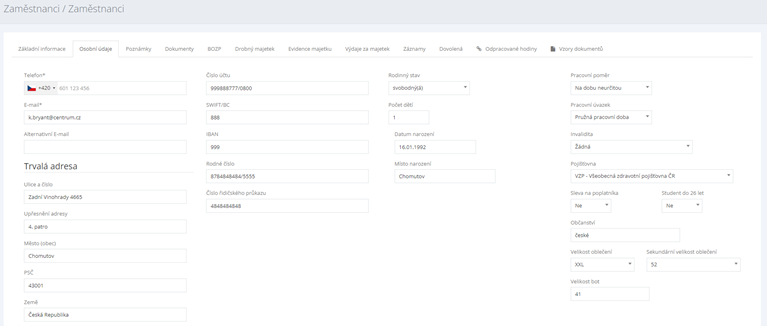
The system checks the completion of the following mandatory data:
- Phone number with area code
- Email address
Notes tab
Unstructured notes and employee information are written in the text editor on the Notes tab.
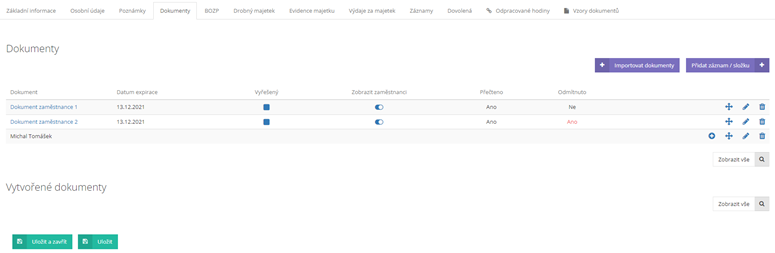
Documents tab
The card is used to manage basic documents related to the employee. For clear management of all documents, folders are used in which individual documents can be classified. You can find more information about document management in the chapter "Employees / Documents".
Health and safety tab
The card is used to record health and safety resources. You can enter the record both from the employee's card and directly from the Health and Safety Agenda.
- In the open individual employee tab in the "Employees / Employees" agenda, go to the "Health and Safety" tab.
- Press the button and continue processing the data.
- In the "Record type" field, select "Record" from the drop-down menu.
- Fill in the description of the processed record in the "Name" field. This information is mandatory.
- Mark the resource record as (not) forwarded by selecting Yes / No from the drop-down menu "Transmitted".
- Set the “Repeat” option - Yes/No by selecting from the drop-down menu. When setting the Repetition Yes option, a part of the form for setting the number of repetitions and the repetition interval will be displayed.
- You can add another OHS record by pressing the button .
- Finish by pressing the button .
 and continue processing the data.
 .
. .
.Small property tab
Small property records. The list of assets processed in, for example, an XML table or a PDF file can be uploaded to the application.
- Click the mouse in the "Drop files to upload" data upload field.
- Find the location of the file in explorer.
- Press the “Open” button. The property list is loaded into the form.
Note: You can enter another table or photos in the same way. The form also allows you to print an overview of Small Assets. To print, use the "Print small property" button.
Property records tab
Here you can find the property records that the employee is assigned to, the so-called "on card". You can register new assets on the employee card in two ways:
- By writing in the "Property records" tab in the employee's personal record
- By creating an entry in the "Property" agenda and assigning it to a specific employee
Property Expenses tab
Information on property expenses.
Records tab
Complete overview of attendance and other employee activities. The record type is the highlighted graphic mark.
On this tab, the record can be corrected by pressing the "Edit record" button.
A complete overview of attendance for all employees is available from the "Employees / Records" agenda. The quickest way to get to this report is to press the "View all" button located in the lower right corner of the report.
Vacation tab
The card combines information about the employee's entitlement to and use of leave. Enter the number of vacation entitlement days in the "Number of vacation days per year" field.
Enter the holiday payment instruction using the function  .
.
- In the open employee record, in the "Vacation" tab, press the button .
- In the displayed form, enter the number of days and the amount to be paid.
Enter the transfer of unused vacation as follows.
- In the open employee record, in the "Vacation" tab, press the button .
- In the form window that appears, enter the number of days for the transfer. Finish by pressing the button .
- The number of days of leave claimed is recalculated and updated.
 .
.Hours worked tab
The card collects data and values from the employee's attendance. The "Worked hours" tab is linked to the "Reports / Employee hours worked" tab.
Document Templates tab

The tab allows you to generate a specific document from a template. E.g. The employment agreement. The created document will be downloaded to your computer.
- Select the type of document in the Tab and click on the “+” sign to open the detail of the record.
- Fill in the identification data in the right part of the document
- Press the button .
- Press the button to generate the document.
 to generate the document.
Bulk import of employee records
The application enables mass import of records from the template in XLSX format. A sample import template for download is available directly in the employees module under the button  .
.
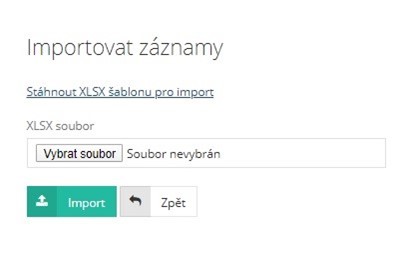
Attention! Pay attention to the mandatory fields, they are marked with an asterisk in the import template.
How to fill out the Employees template
The import template has pre-populated column headers. Fill in the "Active" field according to the following key: 1 = yes; 0 = no. Individual employee records can be edited later.
- In the open "Employees / Employees" agenda, press the button .
- Press the “Select File” button.
- Select the completed XLXS employee file on your computer.
- Press the “Open” button. The list is loaded into the application environment.
- Finish by pressing the button .
 .
.You can further edit and add to the loaded records.
Basic actions performed on the list of employees
Sending the PIN to the employee's mobile phone
Employees use a mobile application with a unique login code and password to record attendance. The system sends the access data to the employee's phone number immediately after saving the record.
Successful completion of the "Send PIN and Password  " action is visually symbolized by a green bar/banner on the staff list.

If you lose your PIN and password, you can repeatedly send this data to the employee's mobile phone from the application.
- In the list of employees, focus the cursor on the line of the employee.
- Press the button "Send new pin to email and SMS ".
- The data will be sent immediately to the contact details provided.
Setting the employee as Inactive
- In the list of employees, focus the cursor on the line of the employee.
- Switch the switch in the active field to the "Inactive " position.
 " position.
You can also perform the "Active" setting adjustment in the "Basic Information" tab of the respective employee.
Hours worked
A quick overview of the hours worked in the current month, for the selected employee.
- Press the button "Hours worked ".
- The system displays the "Reports / Summary of hours worked" agenda of the selected employee.
 ".
".Agenda of the Group
Division of employees into groups, so-called parties.
Creating a new record
- In the "Employees / Groups" agenda, press the button .
- Fill in the name of the group in the "Name" field.
- Finish by pressing the button .
Assigning an existing employee to a group
- In the "Employees / Employees" agenda, press the "Edit record " button.
- In the "Group" field, select from the drop-down menu.
- Finish by pressing the button .
 " button.
Tip: Use the option to export records by group. For example, hours worked on a project where you still have the same group of employees.
Agenda Staff / Records
This agenda includes attendance records, data downloads from the mobile application, and a data management environment. Thus, the most important part of the system could be briefly summarized and described.
Overview of records
In a clear table, records of individual employees' arrivals at the construction site or medical visits are displayed. Colored flags distinguish individual records. At the same time, it is possible to filter and edit records in this table.
Primarily, attendance records are taken from the mobile application. The employee is assigned a login code and password. Upon arrival at the construction site, the employee logs into the mobile application and takes a photo. The system synchronizes the data in the mobile application to the cloud of the ERP system when an internet connection is available.
The application administrator will then check the data and correct inaccurate records.
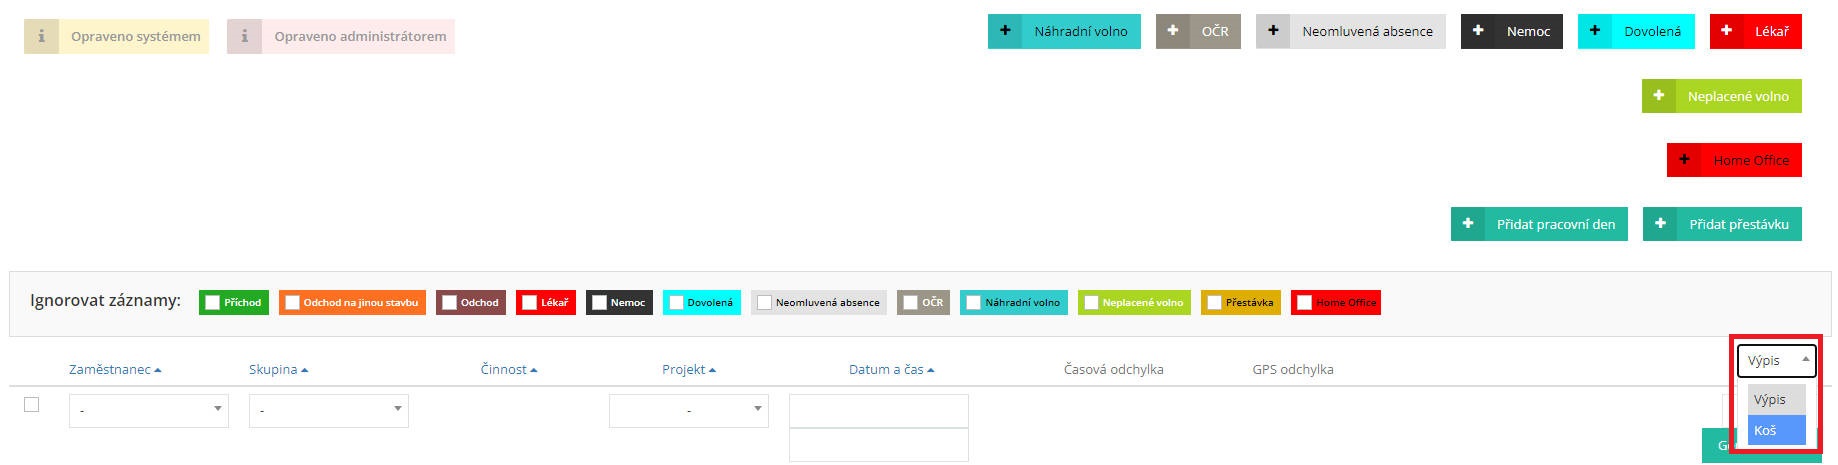
Filtering records
Records allow filtering according to various conditions, e.g. by employee name or by project. The displayed results can be limited by records of vacation taking. You can set all of this simply using the drop-down filter menus and the so-called list check mark. Ignored records.
- Open the "Employees / Records" agenda.
- In the filter panel, in its front part, select the employee name from the drop-down menu.
- In the filter panel, it is possible to "Ignore records" - i.e. mark records that should not be displayed in the result (e.g. vacation, unpaid leave, etc.).
- Finish by pressing the button located on the right side of the filter bar.
You can cancel the filter by setting the “–” option in the "Employee" field and pressing the button  .
.
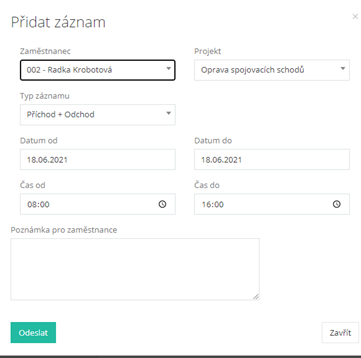
Creating a new record
In some cases, it is necessary to create a workday record manually. Especially if attendance was not loaded from the mobile application.
Any other record can be entered using the same procedure, e.g. Family member care record (OCR). The easiest way to select the recording type (holiday, OCR) is to press the appropriate button. The record type is then transferred to the form.
- In the open agenda "Employees / Records" press the button .
- In the displayed form, click in the "Employee" field and select the desired name in the drop-down menu.
- Click in the "Date" field and set the appropriate date. One working day is always added. The system fills in the current date.
- Check the completed “Arrival Time” and “Departure Time”. Alternatively, make the settings by writing in the appropriate cells.
- Finish by pressing the button .
 .
. .
.
Break
The mobile application allows you to enter a pumping break. GPS is recorded when you start drawing a break. When an employee is on break, it is not possible to work with the Stavario mobile application. Once the break is over, all app functionality is restored. The default break length is set to 30 minutes. The length of the break can be changed in the "Basic settings" tab for a specific employee in the "Employees / Employees" agenda.
A break can also be added manually
- In the open "Employees / Records" agenda, click the button .
- In the displayed form, click in the "Employee" field and select the desired name in the drop-down menu.
- Click in the "Date" field and set the appropriate date. One working day is always added. The system fills in the current date.
- Check the completed “Time From” and “Time To”. Alternatively, make the settings by writing in the appropriate cells.
- Finish by pressing the button .
 .
.Editing an existing record
In some cases, it is necessary to edit the records retrieved from the mobile application.
- In the open "Employees / Records" agenda, focus on the required line.
- Press the button “Edit record ”. The form can also be opened by clicking the mouse on the row.
- Edit the required information in the displayed form.
- Complete the text note for the employee, this is mandatory information.
- Finish by pressing the button .
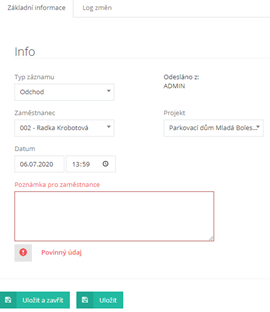
The system checks for duplicate entries. You will be informed about inappropriate entry. The system will create a record and it can be further edited.
Deleting records
- Mark unwanted records and delete them en masse. The button is available at the bottom of the list.
- Deleted records are moved to the system trash. Such records can be restored.
- On the right side of the screen, click on the drop-down menu where select "Trash" and press .
- Focus on which record you want to restore and press the "Restore " button.
 is available at the bottom of the list.
 where select "Trash" and press
  " button.
Export records
To export records of hours worked by employees, go to the "Reports / Hours Worked" module, or "Reports / Hours worked on the project".
- Go to the "Reports / Hours worked" agenda.
- Select the employees whose records are to be generated.
- Set the desired period by selecting from the calendar.
- Finish by pressing the button .
 .
.The finished file will be downloaded to your computer and you can print.
Agenda Employees / Documents
Agenda for registration and management of documents associated with employee records. All documents that are generated from the application with a link to employees will be displayed right here. It can be agreements, contracts and others.
Folders can be created in this agenda for better orientation in documents.
Adding a new folder
- In the "Employees / Documents" agenda, press the button .
- In the "Record type" field, select "Folder" from the drop-down menu.
- Fill in the name of the folder (eg Agreements). This field is mandatory.
- Finish by pressing the button .
 .
.Adding a document to a folder
- V agendě “Zaměstnanci / Dokumenty” zaměřte složku, do které dokument chcete zařadit.
- Press the button “Add record / folder to folder ” .
- Fill in the "Name" field. This field is mandatory.
- Set the "Resolved" field according to the status of the record.
- Choose the expiration date by selecting from the calendar.
- You insert the document attachment from your computer by clicking the "Drop files to upload" button and select the desired file.
- Continue by choosing in the "From user" or "For users (on the bulletin board)" fields.
- By selecting an employee from the drop-down menu in the "For employee" field, you add the document to the employee's mobile application.
- You can enter a text note in the "New comment" field and send it immediately using the button .
- Finish by pressing button or .
 ” .
” . .
.Agenda Employees / News
News makes it possible to inform selected or all employees in a simple way about current events in the company, the acquisition of new assets or the plan for taking vacations. The message processed in this way is displayed to selected employees in their mobile application, where they must read and sign it before recording attendance.
Creating a new record
- In the "Employees / News" agenda, press the button .
- In the displayed form, set "Yes" in the "Default news for new employees" field.
- Fill in the date by selecting from the calendar.
- Enter the new link to the property in the "New property" field, where you select the property item from the drop-down menu.
- In the "Attached document" field, choose the document with which the news is accompanied.
- Write the title of the news in the "Title" field.
- Write the news in the text editor, which will later be displayed to the employees.
- Exit by pressing the button .
In the second tab "Employees" information is available on which of the employees have already read the news.
Employees will see the news in the mobile application. This report must first be read and signed by the employees before they can enter the construction site.
Agenda Employees / Vacation and absence
The agenda provides a quick overview of vacation usage and planned usage. The data is displayed in a clear graphic form.
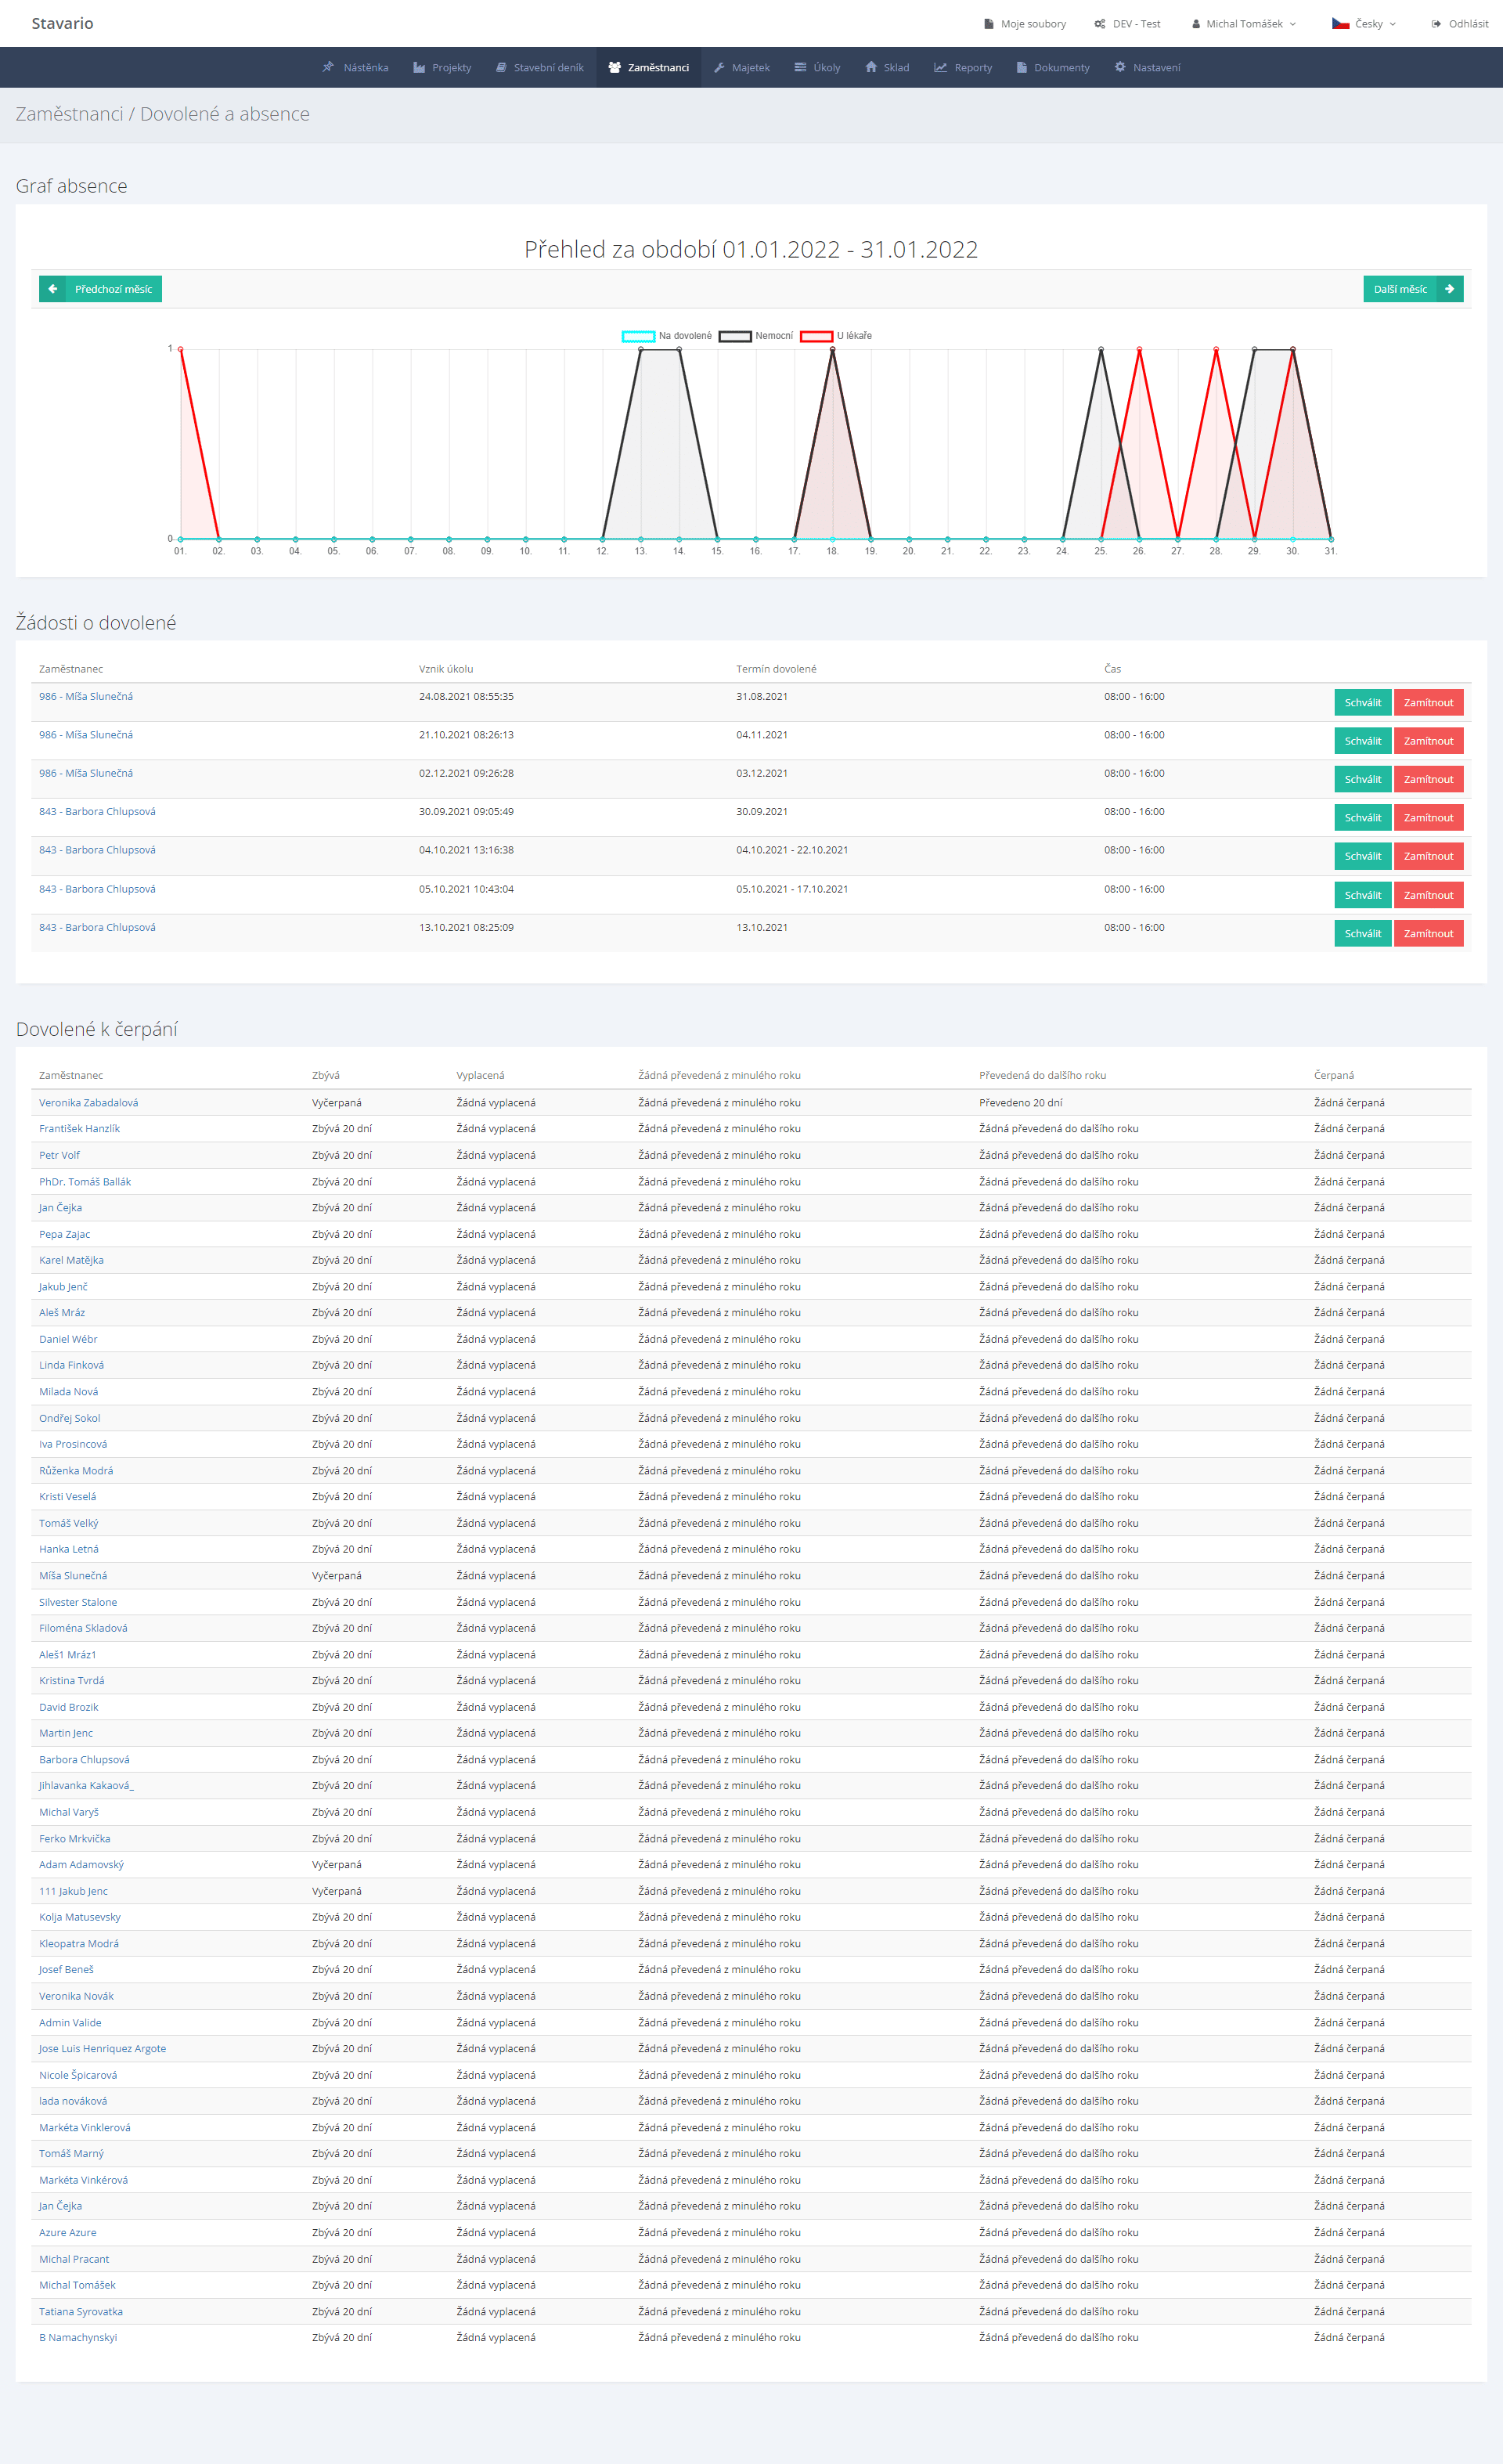
Leave requests
In this section, you can see all employee leave requests. You can “Approve” or “Reject” requests using the buttons on the right.

Allowed to draw
In this section, you can see a list of all employees assigned to you and their vacation information (how many days are left, paid vacations, transferred vacations from the previous year / to the next year and how many days have been used up.
By clicking on the selected employee, you will be taken to the "Vacation" tab in the "Employees / Employees" agenda, where you can transfer vacation, pay or add extra days.
Enter the holiday payment instruction using the function .
- In the open employee record, in the "Vacation" tab, press the button .
- In the displayed form, enter the number of days and the amount to be paid.
Enter the transfer of unused vacation as follows.
- In the open employee record, in the "Vacation" tab, press the button .
- In the form window that appears, enter the number of days for the transfer. Finish by pressing the button .
The number of days of leave claimed is recalculated and updated.
Agenda Employees / OSH
This agenda contains records of health and safety funds issued to the employee's card. Basic information about health and safety resources can be set for periodic repetition. The system informs in advance about the need to secure new funds.
Creating a record folder
If you want to sort records into folders, create the first record of type "Folder".
- In the open "Employees / Health and Safety" agenda, press the button .
- In the displayed form, select "Record type" - "Folder" from the menu.
- Fill in the "Name" field. This field is mandatory.
- In the "Employee" field, select the employee for whom the folder will be created by selecting from the menu.
- Finish by pressing the button .
Resource record
- In the open "Employees / Health and Safety" agenda, press the button .
- In the displayed form, select "Record type" - "Record" from the menu.
- Fill in the "Name" field. This field is mandatory.
- In the "Employee" field, select the employee for whom the record will be created by selecting from the menu.
- Mark the OSH resource as "Handed over / not handed over" by choosing from the "Handed over" drop-down menu.
- In the "Repeat" field, select "Yes" for automatic repetition.
- Finish by pressing the button .
 .
.Creating documents with signatures
- In the list of items in the "Employees / Health and Safety" agenda, mark the records for which the document should be generated.
- Press the button .
- The document will be downloaded to your computer.
 .
.Create a recurring command
- In the "Employees / Health and Safety" agenda, press the button .
- Click the button .
- In the displayed form, select "Active" - "Yes" from the drop-down menu.
- Set the “Repeat Interval” by selecting from the drop-down menu.
- Select “Start date” from the calendar.
- Fill in an informative description in the "Name" field. This field is mandatory.
- Go to the second tab "Employees" and assign a repeat order to individual employees by marking them.
 .
.Changing the recurring order
The order change concerns e.g. addition of other employee records.
- In the "Employees / Health and Safety" agenda, focus on the record you want to edit.
- Press the button “Edit record ”.
- Press the button to finish editing.
It is possible to delete an unsatisfactory record of the Order of regular repetition. In the list of commands, focus on the line and press the button “Delete record  ”.
”.